

Generating PDF documents or reports is a quite common task in software development. There are many use cases for that: hospital reports, company time logs, invoices, you name it. And, trust me, every developer is facing the same set of issues for the task.
- What approach to use for PDF generation?
- How to manage the page breaks?
- Is it possible to have the final document previewed immediately?
- Do we need to have a Java/C#/Python or any other language-based server or can we do it with JavaScript?
- Should we consider some third-party solution and whether it fulfills all our requirements?
- Maybe it should be on the Front End (client) side instead of the Back End?
Those, and many other questions are the common thing when it comes to PDF generation. The goals vary, and so do the answers. Our goal is to have a generic approach for building the PDF document using React and JavaScript (well, TypeScript to be specific) on the server with an instant preview of the UI. I hope this would be a journey you’d enjoy!
Questions need to be answered first
Why should it be on the server if we can print it from the UI in the browser?
Rendering from the client’s machine, in the client’s browser is challenging. There would be no consistency between the two users because the final result would depend on many factors like screen resolution, availability of the fonts, and whether it’s a retina screen or not, also there could be differences between the browsers which users potentially are using. This would work for a very low level of requirements or as a first version since it is quite easy to implement.
Should I use some other programming language on the server or a third-party service?
The third-party services would work fine for generic PDFs, maybe with quite some level of flexibility, but most likely never as flexible as a custom solution. This is a tradeoff for using ease.
Also, using other languages restricts us from the ability to reuse the React components for both PDF reports and instant previews. Later, we will talk about this more definitely, but for now — we can assume, that adding another language is increasing the complexity of the codebase and requires either us to learn/know that language or to hire another developer specifically for this.
Is there a way to use React as a content builder?
Yes, absolutely! React can render on the server side into an HTML string, which we can easily convert into a final PDF afterward.
Hence, if we are using React and by having a dedicated set of components for the documents we can have an instant preview of the final document and also reuse those components on the server to create a PDF version. Don’t you think this is neat, huh?
Where to start?
Brief
Our goal is to acquire a tool that can easily create PDF files reusing the same components that we use on the UI application.
Shortly, we will create 3 projects: the UI application, Shared components, and PDF Report service. The idea is to have defined building blocks of the possible PDF, separate the data layer, and have an instant preview of the UI application. Now, let’s get deep into the details.
Step one: Project structure
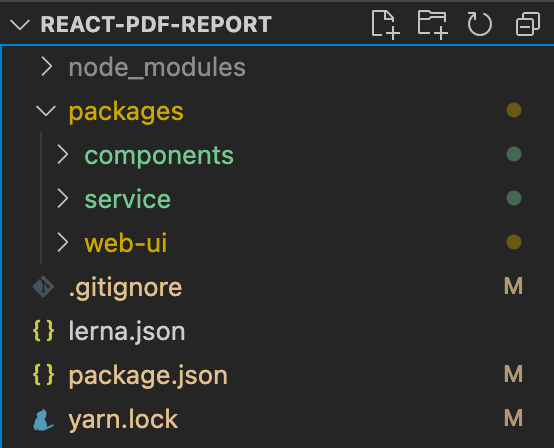
It is important to have the components extracted to a separate codebase because we would need to import them into both Web UI and Report service. The way you have to implement this does not matter. It could be a private package for shared components or monorepo or any other approach. The main goal is to be able to access the same shared codebase on both ends, UI and Report Service. Here is a simple preview of that structure.


In my example, I used a basic Lerna monorepo setup with Yarn workspaces, the final code repo will be linked in the end. There are 3 packages I have, as on the diagram above, so the component package is being imported to the Web UI and Report service.
Step two: Setup basic Web UI layout
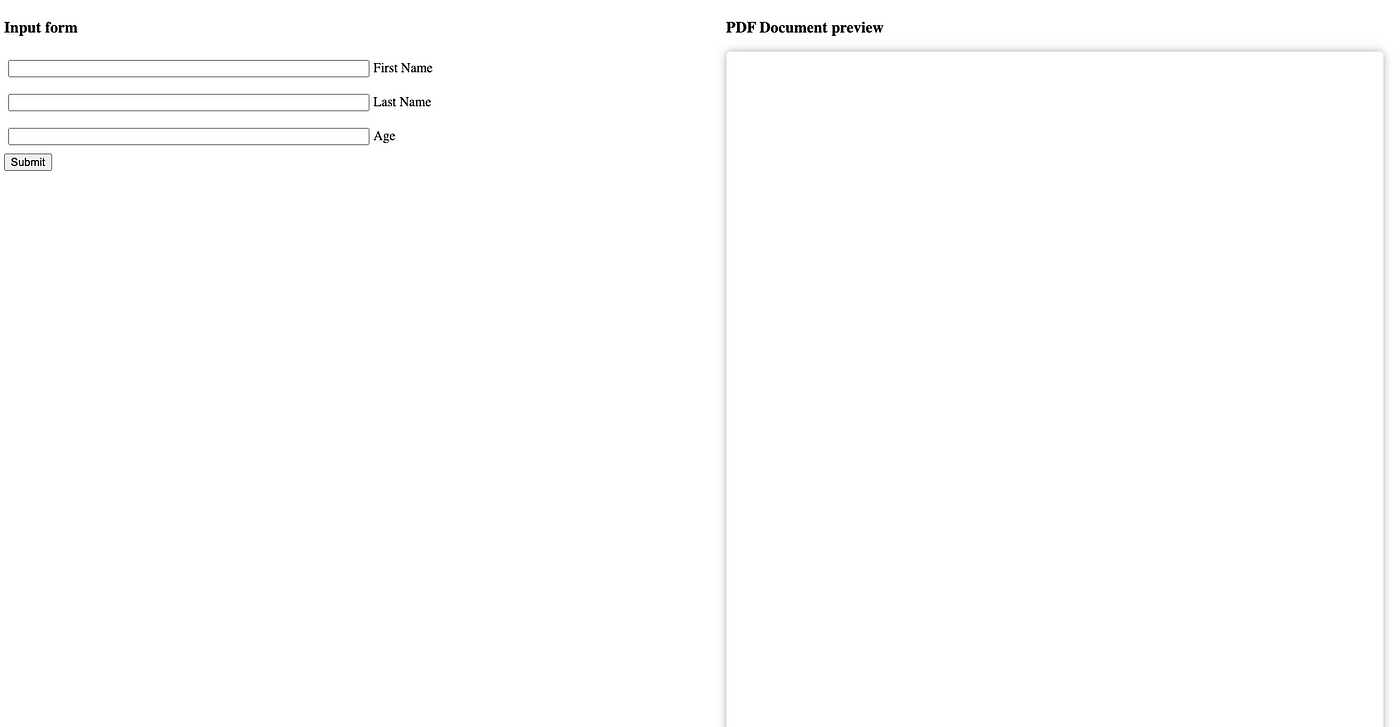
For demonstration purposes, we can have a really simple layout on the screen. Let’s divide it into two halves, where the left one is a data source and the right one is the instant PDF document preview. Right now we will just have a basic working inputs form with minimal validation. Actually, the form is a copy-paste example from the react-hook-form, which I’m using here as well.
The other half is the empty preview container which we will update later. For now, it is just a placeholder with the dimensions of the A4 document format.
Step three: Basic report components setup
During this step, we will set up the shared components package. I used Create React Library, again, for simplicity. The setup does not matter in our case, our only need — is to have a final build file with the components to reuse on the client and the server sides.
What is actually important within this step is to define what kind of components we are willing to have available for the PDF documents. So, now we can freely transition from the concept of the Component to a Block.
Then what is the difference between a Component and a Block, you might ask? Technically, the block is a recursive serializable data structure. It describes what kind of UI element to use, where to pull the data for it, and if there are any specific attributes available for it. Any kind of UI element that we want to have on the PDF document — we should describe it as a block, first. In other words — there is a BaseBlock abstract class and plenty of concrete classes for every generic element. Think of the blocks as a description of what we want to see, like a Title block or Image block, maybe also a block for the list of items.
Base block abstract class:
type KeysMatching<T, V> = {
  [K in keyof T]?: T[K] extends V ? K : never;
}[keyof T];

export abstract class BaseBlock<T = {}, A = unknown> {
  public abstract readonly identifier: Identifier;
  public metadata?: T;
  public accessor?: KeysMatching<Data, A | undefined>;
  public items: BaseBlock[] = [];

  constructor({
    items = [],
    metadata,
    accessor
  }: {
    accessor?: KeysMatching<Data, A | undefined>;
    items?: BaseBlock[];
    metadata?: T;
  }) {
    this.items = items;
    this.metadata = metadata;
    this.accessor = accessor;
  }

  public abstract Component: React.FC<T>;
}
Every block has a list of required properties: Identifier and Component. Additionally, we have an accessor, metadata and items.
With Identifier enum we can deserialize the block from JSON to the correct concrete class implementation, where there would be a Component property, a function of an actual UI for this block. With accessor we can get the value for this specific instance of the block (think of the Title block, there could be many different titles, but the block is one, so we only change the accessor). Blocks are recursive, so every one of them (almost) has an items property, a list of children's blocks. Last but not least, is the metadata property, we need it to describe some of the specific details of the block instance. For example, a Title block can have different styling like bold, italic, etc. So, this is what the metadata is.
Title block implementation:
interface Metadata {
  theme?: TextThemes;
  color?: TextColors;
}

export class Title extends BaseBlock<Metadata, string | number> {
  identifier = Identifier.Title;

  Component: React.FC<Metadata> = ({ theme, color }) => {
    const value = useDataValue(this.accessor);

    if (value === undefined) {
      return null;
    }

    return (
      <Text theme={theme} color={color}>
        {value}
      </Text>
    );
  };
}
By leveraging the power of blocks we can build a Schema for the type of document we want. We can define several schemas, each one is built from many blocks. One schema could describe a document structure for the employee Time Logs, another schema describes the structure for an Invoice. Both are made with the same blocks but differently structured.
By having the serializable Block data structure we are obtaining several benefits:
- The layout of the report can be constructed dynamically.
- We can consume schema not only in our service but, maybe, on the other service built with different programming languages, in case, we will need to support that in in prospect.
- Schema can be stored in the database as a simple JSON and transferred over the network easily.
- We create a restricted set of supported blocks, so no magic here. It also helps to avoid vague product requirements.
- Scoped implementation, preventing chaotic code structures that are unreadable.
Another thing left is to render the schema in React. And guess what? It is so simple because every block from the rendered perspective is the same, it does not bother with the actual block implementation, it just renders.
Since the structure is recursive we render it in a recursive way. Key optimization is important only on the same nesting level, so for simplicity, we use an identifier with an index. But you can have some ID instead, or actual value.
Component to render the Schema:
interface Props {
  schema: BaseBlock;
}

export const RenderBlock: React.FC<Props> = ({ schema }) => {
  return (
    <schema.Component {...schema.metadata}>
      {schema.items.map((item, index) => (
        <RenderBlock schema={item} key={item.identifier + index} />
      ))}
    </schema.Component>
  );
};
And, finally, the actual schema is just a multi-level JavaScript object of block instances. We will feed it into the RenderBlock component and all the magic is done there. Neat!
Example of the Schema:
export const defaultTemplate = new BlockFragment({
  items: [
    new Padding({
      metadata: {
        right: 32,
        left: 32,
        bottom: 24
      },
      items: [
        new Title({
          accessor: 'firstNameTitle',
          metadata: {
            theme: 'h1',
            color: 'gray'
          }
        }),
        new Title({
          accessor: 'firstName',
          metadata: {
            theme: 'h1'
          }
        })
      ]
    })
  ]
Step three: Data provider
It is a huge deal to separate the Schema from the actual data, so they can be dynamic. Who would need a layout that is tightly coupled to the data, right? That is why every block has an accessor property. By the accessor, we can literally access the data needed for this specific instance of the block. Let’s say, we can have several titles, so the possible accessors are firstName, lastName, etc.
The React way of doing this is simple — the Context API. Our data object would be mostly a flat object, so we avoid complex accessors (even though it is possible, but harder to maintain). The provider component would wrap up the RenderBlock component. This way the data is provided by the DataProvider and is easily accessible via the hooks inside of the block's implementation, and the layout (Schema) is provided separately. Well, you should already get the idea and the benefit.
Data provider code:
export interface Data {
  readonly firstName?: string;
  readonly lastName?: string;
  readonly age?: number;
}

const dataContext = React.createContext<{
  data: Data;
}>({
  data: {}
});


const useDataContext = () => useContext(dataContext);
export const useDataValue = <T extends keyof Data>(
  accessor?: T
): Data[T] => {
  const { data } = useDataContext();

  if (!accessor) {
    return;
  }

  return data[accessor];
};

export const DataProvider: React.FC<{
  data: Data;
}> = ({ children, data }) => {
  return <dataContext.Provider value={{ data }}>{children}</dataContext.Provider>;
};
Another great thing, we were able to achieve, is that TypeScript won’t let us push an unknown accessor to the block instance. We defined our Data object with the list of available accessors and their type. Let’s try to use an unknown accessor and see what happens.
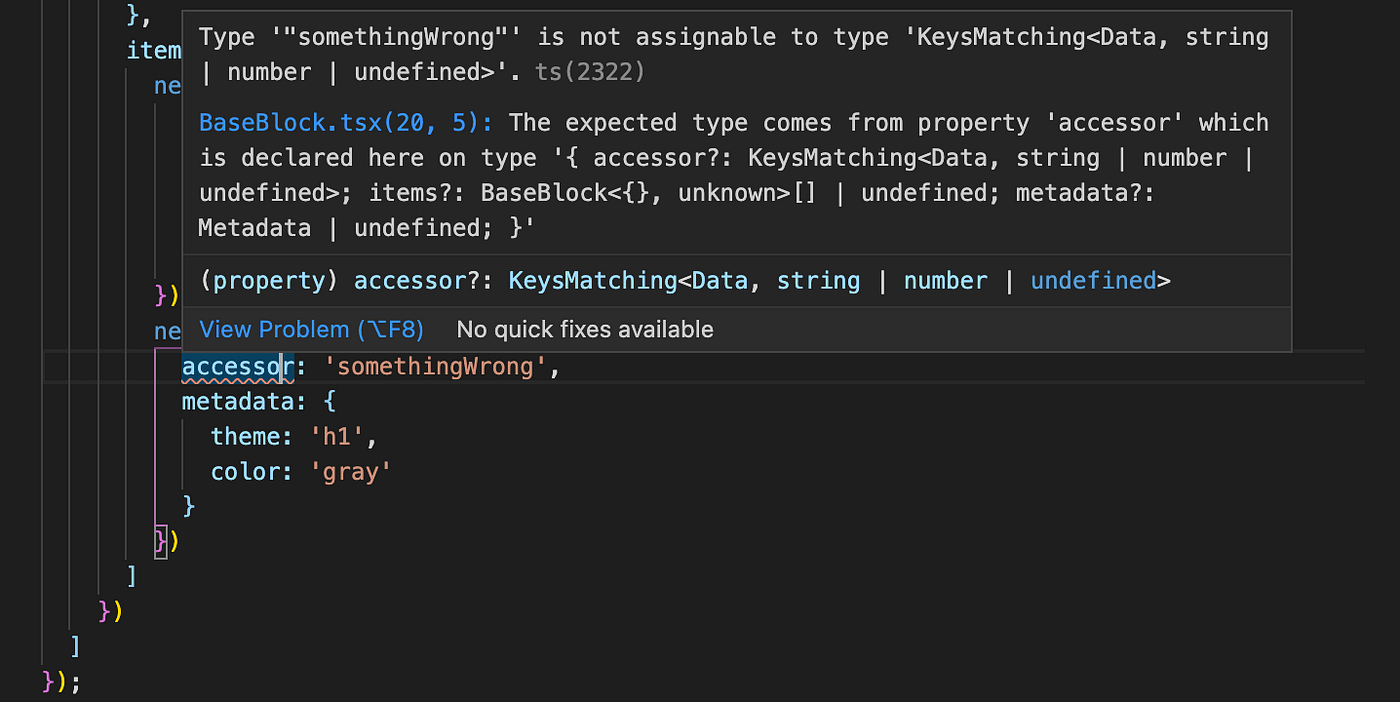
Thanks, TypeScript! This is very useful to prevent developer mistakes. Of course, this is only a compile-time error, but it helps anyway. If required — we can have a runtime check with a bit more work there, but now, that is not our goal.
Step four: Set up the server-side
We can go with either a straightforward (express) or structured (Nest.js) approach. I prefer using Nest.js for the back-end services because it has a clean way of doing things out of the box. Not only that, this is a framework, so I don’t bother with additional setup steps.
What we actually need for the simple use case — is a single endpoint. To that endpoint, we are going to push the body with Schema and Data. And then, the rest of the work is moved to the service.
The strategy of getting an actual PDF result is to follow several simple steps:
- Accept the Schema and Data through the REST (not necessarily) API
- Parse the body and validate it. (Check for unknown identifiers, etc)
- Deserialize Schema JSON into actual block instances
- Feed the Schema to the
RenderBlockcomponent and Data to theDataProvidercomponent - Render everything to the HTML string (or stream). Optionally include the necessary CSS code
- Sanitize the HTML result to cover the security risks
- Using Puppeteer render HTML in the headless Chrome and extract PDF files with the supported API
- Push the PDF file as a stream to the client in the HTTP response
These are basic steps to create a PDF this way. Of course, we can have some extra steps in between, but it’s another story. The main idea is to create a final HTML and convert it into a PDF using Puppeteer.
If you are not familiar with Puppeteer — it is an API abstraction layer over the headless Chrome or Chromium browser.
What is also important in our case, is to run the service inside of the Docker container. This way we can have a consistent resulting PDF document that does not rely on the type of server it runs on.
Validation of the body is quite simple for use. With the data structure that we have here, it is important to only check if the block identifier from the Schema is the one that we know, otherwise, it is an error in the payload. We would throw an exception if the body is invalid. In Nest.js this is done via a validation pipe using the class-validator library.
PDF controller with validation:
@Controller('pdf')
@ApiTags('PDF')
export class PdfController {
  constructor(private readonly pdfService: PdfService) {}

  @Post()
  @ApiCreatedResponse({
    description: 'Generate PDF for the template schema and data'
  })
  @ApiInternalServerErrorResponse({
    description: 'At some point of PDF generation process has failed'
  })
  @ApiBadRequestResponse({
    description: 'Invalid body'
  })
  @ApiBody({ type: CreatePdfDto })
  async create(
    @Body() createPdfDto: CreatePdfDto,
    @Res() res: Response
  ) {
    const buffer = await this.pdfService.create(createPdfDto);
    const stream = this.pdfService.getReadableStream(buffer);

    res.set({
      'Content-Type': 'application/pdf',
      'Content-Length': buffer.length,
      'Content-Disposition': 'attachment;filename=result.pdf'
    });

    stream.pipe(res);
    return;
  }
}
The other part is deserialization. At this point, we can be sure that the body is valid, so we can simply deserialize that plain object into the actual block. We have already prepared for this by providing the function in the component library for deserialization. It makes sense to keep that logic in the components project, this way it is encapsulated and the service does not need to know too much about the data. Again, in Nest.js we are using class-transformer to convert every block into a plain block (it only has an instance, but does not implement any UI). Plain blocks are useful because we can run validation on them. After, we convert them into the correct blocks using deserializeSchema there would be no problem feeding that into the RenderBlock component.
@Injectable()
export class PdfService {
  constructor(private readonly schemaRendererService: SchemaRendererService) {}

  create(createPdfDto: CreatePdfDto): Promise<Buffer> {
    let schema: ReturnType<typeof deserializeSchema>;

    try {
      schema = deserializeSchema(createPdfDto.schema);
    } catch (e) {
      throw new UnprocessableEntityException(e?.message);
    }

    return this.schemaRendererService.renderPDF(
      schema,
      createPdfDto.data
    );
  }

  getReadableStream(buffer: Buffer): Readable {
    const stream = new Readable();

    stream.push(buffer);
    stream.push(null);

    return stream;
  }
}
PDF service with deserialization
Ok, great, we have the valid and transformed data at this point, so it can be pushed into a render step.
React library lets us use the react-dom/server package, with which we are able to render the UI, but specifically on the server. It could be either string or stream, but we will go with HTML string for simplicity. So, the structure is clear here, we render the Data provider and schema, then store the resulting HTML string into a variable. We won’t use JSX to prevent the configurations to support that in the Nest.js setup. But you could if there is a need. Once the HTML is ready, you just have to add a proper HTML wrapper, I mean head, body, styles if necessary.
Also, you can get the support of the images, if you convert them into a data URL.
HTML generation:
  ...
  renderHTML = (
    schema: ReturnType<typeof deserializeSchema>,
    data: Data
  ): string => {
    return this.wrapWithTemplate(
      ReactDOMServer.renderToStaticMarkup(
        React.createElement(
          DataProvider,
          { data },
          React.createElement(RenderBlock, { schema }, null)
        )
      )
    );
  };
  ...
The whole HTML is ready. For safety, you can also run it through the decoder like ent. Now, we can push it into the puppeteer to get the PDF. There is also the ability to add the HTML template for the header and footer, but it only supports the inline CSS styles there.
To open the page with the UI for PDF, we should turn it into the data URL with base64 encoding.
HTML to PDF conversion:
...
private convertHTMLToPDF = async (
    html: string
  ): Promise<Buffer> => {
    if (typeof html !== 'string' || !html) {
      throw new InternalServerErrorException(
        'Invalid Argument: content for the PDF is not a string.'
      );
    }

    let browser: Browser;
    try {
      browser = await puppeteer.launch();
    } catch (e) {
      throw new InternalServerErrorException('Unable to launch PDF Renderer');
    }

    let page: Page;
    try {
      page = await browser.newPage();
    } catch (e) {
      throw new InternalServerErrorException('Unable to create page for PDF');
    }

    try {
      await page.goto(
        `data:text/html;base64,${Buffer.from(html).toString('base64')}`,
        {
          waitUntil: 'networkidle0'
        }
      );
    } catch (e) {
      throw new InternalServerErrorException(
        'Unable render the  on page'
      );
    }

    let result: Buffer;

    try {
      result = await page.pdf({
        format: 'a4',
        printBackground: true
      });
    } catch (e) {
      throw new InternalServerErrorException('Unable render page into PDF');
    }

    try {
      await browser.close();
    } catch (e) {
      throw new InternalServerErrorException('Unable close PDF renderer');
    }

    return result;
  };
...
The result is a PDF buffer which we can then simply feed into the response stream. You can, of course, feed it as a plain HTML string, but with the support of the stream, we can reduce memory load slightly. With the file stream, we should specify the content type, content length, and content disposition with the final file name.
...
async create(
    @Body() createPdfDto: CreatePdfDto,
    @Res() res: Response
  ) {
    const buffer = await this.pdfService.create(createPdfDto);
    const stream = this.pdfService.getReadableStream(buffer);

    res.set({
      'Content-Type': 'application/pdf',
      'Content-Length': buffer.length,
      'Content-Disposition': 'attachment;filename=result.pdf'
    });

    stream.pipe(res);
    return;
  }
...
Step five: connect UI and Shared component
Since both UI and Shared components are ready for use, now, we should start connecting them. Gladly, with Lerna, we can import components easily between the projects, the same way as with the PDF service.
We can now replace the PDF preview container content with the real preview. So, as was mentioned before — the data is separate and the template is separate.
Rendering instant preview of the PDF:
...
<div>
  <h3>PDF Document preview</h3>
  <div className={styles["report-preview"]}>
    <DataProvider data={data}>
      <RenderBlock schema={defaultTemplate}/>
    </DataProvider>
  </div>
</div>
...
Data payload creation:
...
const { register, handleSubmit, formState, watch } = useForm<FormData>();
const onSubmit = (data: FormData) => console.log(data);

const data: Data = {
  firstName: watch('firstName'),
  firstNameTitle: 'First name: ',
  lastName: watch('lastName'),
  lastNameTitle: 'Last name: ',
  ageTitle: 'Age: ',
  age: watch('age')
}
...
We made a lot of effort to make the preview easy to use. Also, for simplicity, we reuse the default template with titles included. The results are noticeable! So now, we can recognize every change from the form reflected on the preview. You can also create separate pages emulation if necessary, of course. But it is not in our example case.
Step six: connect UI and Service
With all we have at this point, not much is left to do. Let’s connect the UI with the service and see the final results as PDF!
For this simple case, it is enough just to use fetch method to call the service. As a result, we will open the generated PDF document in the new window. But, you, of course, can save the resulting Blob in any way you want.
HTTP Request to the PDF service:
...
const data: Data = {
  firstName: watch('firstName'),
  firstNameTitle: 'First name: ',
  lastName: watch('lastName'),
  lastNameTitle: 'Last name: ',
  ageTitle: 'Age: ',
  age: watch('age')
}

const onSubmit = () => {
  setLoading(true);
  fetch('http://localhost:5000/api/v1/pdf', {
    method: 'POST',
    headers: {
      'Content-Type': 'application/json'
    },

    body: JSON.stringify({
      data,
      schema: defaultTemplate
    })
  })
  .then(data => data.blob())
  .then(blob => {
    const file = window.URL.createObjectURL(blob);
    window.open(file, '_blank');
  })
  .catch(console.log)
...
Now you have it! PDF file using the React components!
Conclusion
You went through the full cycle of PDF generation, from the basic steps to the final result.
Sure thing, there are many other possible ways of generating the PDFs, but the way, you went through, is a good fit for the React-based UI.
We were able to reuse the components on both UI and PDF Service, which gave us an immediate preview of the final file. We also created a predictable structure of blocks (Schema), which guarantees the consistency of the resulting reports. By leveraging headless Chrome with Puppeteer we were able to produce the PDF file in the end. Both sides were glued using the REST API with the help of the Nest.js framework, and TypeScript.
With this approach, you can create any type of block, either dynamic or static, complex or simple, reusable or not. The main thought was to show one of the possible ways to solve the problem.
We haven’t really covered the page breaks issue, but with this approach, you can use the page-break-* CSS properties, and it’s up to the requirements of how to place them.
All the code is available on GitHub. Feel free to reach me with suggestions, proposals, or even critiques :)
PS: The repository also contains the Docker setup for the service, code has additional things included (like API swagger and etc), examples in the topic are very simplified.
- Questions need to be answered first
- Why should it be on the server if we can print it from the UI in the browser?
- Should I use some other programming language on the server or a third-party service?
- Is there a way to use React as a content builder?
- Where to start?
- Brief
- Step one: Project structure
- Step two: Setup basic Web UI layout
- Step three: Basic report components setup
- Step three: Data provider
- Step four: Set up the server-side
- Step five: connect UI and Shared component
- Step six: connect UI and Service
- Conclusion